| ||||||
| Ch. 14: Expedient Shelter Furnishings |
|
| Top | Previous | Next |
IMPORTANCE OF ADEQUATE FURNISHINGS
Throughout history, people have endured being crowded together while living and sleeping on hard surfaces. In times of war and privation, people have lived in such conditions for much longer periods than would be necessary for shelter occupancy due to fallout.42Realistic basement-shelter-occupancy tests conducted by research contractors for the U.S. Office of Civil Defense (now the Federal Emergency Management Agency) have shown that modern Americans can live and sleep for two weeks on a concrete floor. In some of these tests, only 8 square feet of floor space was provided for each person; only pieces of corrugated cardboard 3/16-inch thick lessened the hardship of sleeping and sitting on concrete.13
Nevertheless, shelters should be adequately furnished whenever possible, for these reasons:
° More people can occupy a properly furnished shelter for weeks, if necessary if adequate additional ventilation is supplied for the additional occupants.
° Cleanliness, health, and morale are better if well designed furnishings are used. More serious complications than discomfort are likely to result if occupants have to huddle together on a bare floor especially if the floor is damp earth.
° Persons occupying a shelter made relatively comfortable by its furnishings are more likely to stay in the shelter long enough to avoid dangerous exposure to fallout radiation.
CHAIRS, BENCHES, AND BUNKS
The father of the previously described Utah family of six knew that the members of his family would be most uncomfortable and probably would have sore backs if they spent the required 72 hours of continuous shelter occupancy huddled on the floor. (Their shelter room was only 3-1/2 feet wide and l6-1/2 feet long.) So this family took with them from home four folding chairs and two pieces of plywood (each 21 inches wide by 6 feet long) tied as part of the load on top of the family car. Four small wooden boxes served as food containers during the drive to the shelter-building site. In the shelter, the boxes were used to support the ends of two narrow plywood bunks (Fig. 14.1).
The family's system of sleeping and sitting in shifts worked reasonably well. There were discomforts: the adults found the two plywood bunks too narrow, and the plywood was so hard that all the family members used their sleeping bags for padding rather than for needed warmth on chilly nights. The father and oldest son, whose turn to sleep was during normal waking hours, had trouble sleeping in such a small shelter while the lively 4-year-old son was awake.
Note that in the shelter pictured in Fig. 14.1 the earth walls are covered with plastic from trash bags. Covering earth walls with plastic or bed sheets makes for a cleaner shelter, with less earth falling in the faces of people who sleep on the floor. Bedsheets on the walls make a shelter brighter, but are flammable and a potential fire hazard. The plastic film prevented the earth walls from drying and crumbling as a result of the hot, dry desert air pumped through the shelter during the day.
Book Page: 118
Fig. 14.1. Bunks and folding chairs furnished this Pole-Covered Trench Shelter. (Note the suspended transistor radio. Reception is good in all types of expedient shelters tested to date.) 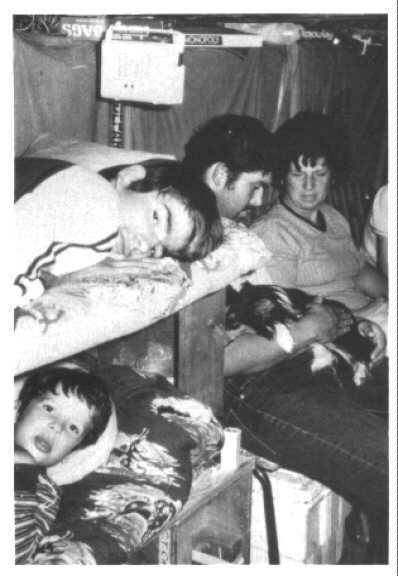
Fig. 14.2. Benches with overhead bunks in a skillfully designed Small-Pole Shelter of Russian design. Three rural families in a wooded area of Tennessee built this expedient blast shelter in 48 hours, including the time spent felling trees and making furnishings. 
Benches with overhead wooden bunks are shown in Fig. 14.2. These were installed in a Small- Pole Shelter 6 feet wide with a ceiling almost 7 feet high.
A well-designed expedient shelter should be as small as practical, with all space used very efficiently. The builders should make the heights and widths of benches and bunks as specified in the detailed shelter drawings, such as those for the Small-Pole Shelter given in Appendix A.3.
Serious difficulties can result from failure to use specific dimensions that may appear unimportant. For example, in field tests at Fort Bragg, N.C., 48 airborne infantrymen, working only with hand tools, cut pine trees and built two 24-man Small-Pole Shelters in less than 24 hours.43 The men did not think it necessary to use the specific dimensions when they made the furnishings. As a result, they built the benches too high and the overhead bunks too far below the ceilings. This error forced the men to sit for hours in hunched positions. Even these able-bodied young men would have developed very sore backs and would have wanted very much to leave their shelters if they had been forced to sit in a bent-over position for days.
Figure 14.2 shows a good example of the importance of using dimensions which have been thoroughly field-tested when building essential parts of a shelter. Note the small air-exhaust opening above the girl lying on the overhead bunk at one end of the shelter.
Book Page: 119
This opening led to a small, chimney- like, air-exhaust duct made of boards, with its cross- sectional area as specified in Russian civil defense handbooks for natural ventilation of small expedient shelters. With such a small air-exhaust opening- only 4 square inches (10 square centimeters) per person a fully occupied shelter of this size would soon become dangerously overheated in warm or hot weather, even though a good low-pressure expedient shelter-ventilating pump (a KAF or a Directional Fan) were to be used. A much larger air-exhaust opening is needed. See Appendix A.3.
BEDSHEET-HAMMOCK AND CHAIR
On the last night of the Utah family's shelter stay it was clear that the six members would win the cash bonus offered them for their 72-hour occupancy of the shelter starting immediately after they completed building it. Therefore, the author showed them that night how to make boat-shaped hammocks out of bedsheets. (Any strong cloth of the right size can be used.) They were shown how to hang these short, yet stable, hammocks securely from poles of the shelterroof. With three members sleeping in hammocks, two on the plywood bunks, and one on the floor, all six could sleep at the same time. Figure 14.3 shows part of this sleeping arrangement.
Fig. 14.3. Girl resting in a boat-shaped hammock. Her brother slept on the upper bunk of their 3-1/2-ft-wide trench shelter. 
In a shelter this size without bunks, hanging four short hammocks at slight angles to the length of the trench would permit four occupants to sleep comfortably. An additional two persons could sleep on the floor. In the Utah family's shelter, the floor was made comfortable by covering the damp earth with pieces of polyethylene cut from trash bags, then placing strips of shag rug over the plastic.
In shelters with ceilings at least 6 feet high, one hammock can be hung above another. In a SmallPole Shelter that is 6 feet wide, a greater number of people can sleep or sit comfortably at the same time if Bedsheet-Hammocks and Bedsheet-Chairs are used rather than benches or a combination of benches and overhead bunks. Figure 14.4 shows how BedsheetHammocks can be used like double-deck bunks.
Fig. 14.4. Bedsheet-Hammocks hung one above the other across the room of a Russian-type Small- Pole Shelter made of lumber. 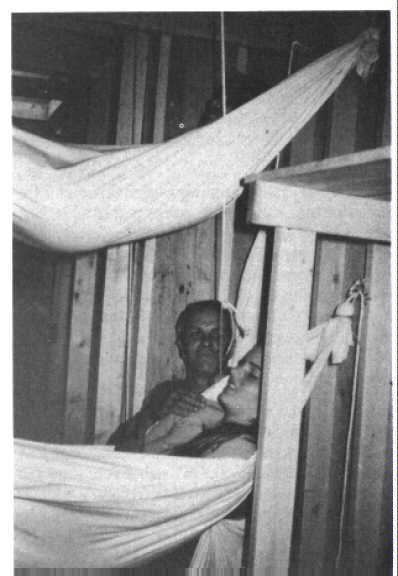
Detailed instructions for making a BedsheetHammock and a Bedsheet-Chair are given at the end of this chapter.
Book Page: 120
In an evacuation during a real crisis, carrying comfortable folding chairs and the materials to make wooden bunks would not be advisable. If the family car were loaded instead with an equivalent weight of additional food and clothing, the members' prospects of surviving would be improved. But in an actual crisis evacuation, a family planning to occupy a shelter with a strong roof should take along a bedsheet for each member. The other lightweight Items described in the instructions for making a Bedsheet-Hammock and a Bedsheet-Chair also should be carried. By following the instructions at the end of this chapter, a comfortable hammock can be made and quickly converted to a comfortable suspended chair when not needed for sleeping.
Hammocks hung high off the floor and above other sleepers must be strong, securely suspended, and cupped so that it is impossible to fall out accidentally. This is why the instructions emphasize using a double thickness of bedsheet and folding the cloth so as to make the hammock boat-like, with high sides.
In a cold shelter, keeping warm in a hammock is somewhat difficult. Easily compressible materials, such as those used in a sleeping bag, are squeezed so thin under a person's body that they lose most of their insulating value. Pads of newspapers about an inch thick, protected by cloth coverings, will reduce heat losses. The best insulation is a quilt, fastened to the underside of a hammock by attaching it with rows of stitches every few inches and at right angles to each other.
Figure 14.5 shows a Bedsheet-Hammock that had been quickly converted into a Bedsheet-Chair and hung near a shelter wall. It occupies less than half the floor space used by the two hammocks shown in the preceding illustration. If a reclining seat is desired, the two support-points on the ceiling to which the chair-arm cords are attached can be located farther out from the wall.
Enough padding material should be placed in the bowl-shaped seat of a Bed sheet-Chair to make it rather flat. Extra, clothing or a folded blanket can be used. The three cords suspending the chair should be adjusted for length so that the sitter's feet can rest on the floor and the edge of the chair seat does not press on the undersides of his thighs. (Such pressure cuts off circulation. During the London Blitz of World War 11, many of the people who sat night after night in shelters on folding chairs with canvas seats developed serious leg conditions. Authorities later prohibited bringing such chairs into shelters.)
CAUTION: To prevent skin infections and other diseases from spreading, a person's hammock or chair should not be used by others. This precaution is particularly important if the shelter is hot and its occupants are sweaty.
Fig. 14.5. A Bedsheet-Hammock converted into a comfortable suspended Bedsheet-Chair. 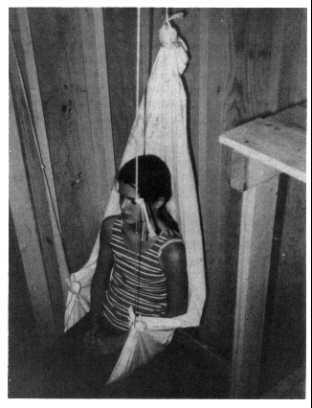
HOW TO MAKE A BEDSHEET-HAMMOCK AND CONVERT IT TO A SUSPENDED BEDSHEET-CHAIR
1. PURPOSE: To enable more people to occupy a shelter more comfortably.
2. ADVANTAGES:
* The hammock can be made in a few minutes, once you have the materials and the knowhow.
Book Page: 121
* The only materials required are a strong double-bed sheet (or an equally large piece of any strong fabric), a few feet of rope (or a piece of strong fabric from which expedient "rope" can be made quickly), a few large nails, and some wire.
* It is difficult to fall out of the hammock because its sides are each made about 8 inches shorter than its lengthwise mid-section, 50 as to produce a boat-like shape.
* It provides room for head and shoulders close to either end; thus it is practical to hang this hammock between supports that are as close together as 6 feet. See Fig. 14.6.
Before beginning work, someone should read aloud all of the instructions for making the hammock. This will help to avoid mistakes.
Fig. 14.6. The author lying in a Bedsheet Hammock. (Note that he is pulling the operating cord of a homemade shelter-ventilating pump, a KAP.) 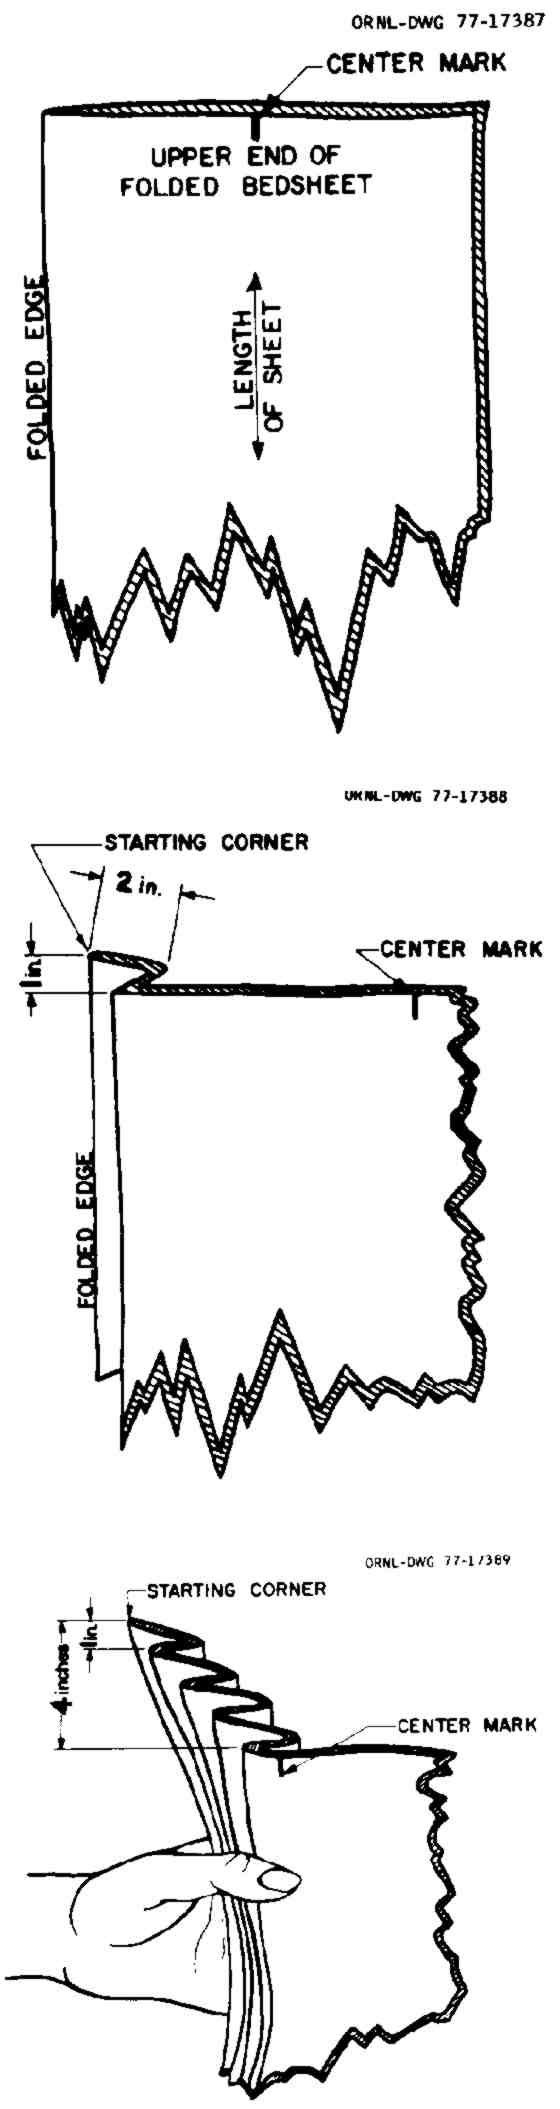
MAKING A BEDSHEET-HAMMOCK
A. How to fold and tie the bed sheet:
1. Select a strong double-bed sheet (one containing polyester is best) and use a ruler or tape measure to avoid guessing at measurements.
2. Fold the bedsheet lengthwise down its center line, so that pairs of corners are together.
3. With the sheet folded, mark the center of each of the two folded ends; then hold one end up.
4. Starting at one corner of one end of the folded bedsheet, make accordion-like pleats. Make each pleat about 2 inches wide; make the left corner of each pleat about 1 inch lower than the left corner of the preceding pleat, when the sheet is being held as illustrated. Use your left hand to hold the completed pleats in place, while making new pleats with your right hand.
(Illustration) ORNL-DWG 77-17387
Book Page: 122
5. When one-half of the upper end of the sheet has been folded into pleats almost to the CENTER MARK, adjust the pleats so that the CENTER MARK is about 4 inches below the STARTING CORNER.
6. Continue making 2-inch pleats on past the CENTER MARK, but make the right corner of each pleat about 1 inch higher than the right corner of the preceding pleat. When the pleat-folding is completed, the STARTING CORNER and the other corner should be at the same height (4 inches) above the CENTER MARK.
7. Tie the hammock-supporting rope tightly around the end of the sheet about 3 inches below the edge with the CENTER MARK. (If a rope strong enough to support at least the weight of two men is not available, make an expedient "rope" by tearing a 16-inch- wide strip from a sheet or other strong cloth and then rolling this strip crosswise to its length to make a tight roll several feet long. Then tie string or small strips of cloth about 1 inch wide around it, spaced 4 to 6 inches apart, to keep the rolled-up cloth from unrolling.)
8. Bend the pleat-folded end of sheet downward around the hammock rope, so that the knot of the hammock rope is uppermost.
9. To keep the sheet from being pulled through the encircling hammock rope, bind the doubled-over end of the sheet with cord (or with narrow strips of cloth) about 1 inch below the rope. Tie the binding cord at least four times around, knotting it each time around.
Fig. Pg. 122 (3 Part Illustration) ORNL-DWG 77-17390 
10. Repeat the procedure (4 through 9) with the other end of the double-folded sheet, thus producing a boat-shaped hammock with its two sides each about 8 inches shorter than its lengthwise center section.
Book Page: 123
| Top | Previous | Next |
A. How to hang the hammock:
1. To suspend a hammock from a strong wooden roof such as the poles of a PoleCovered Trench Shelter, drive two strong nails (at least 3-1/2 inches long) into the wood at approximately 450 angles, crossing and touching each other. Bind the two nails together with wire. To prevent a hammock rope from being rubbed directly against fixed metal, make a loose loop of strong wire (best if doubled) through the crossed nails; tie the hammock rope to this free-moving wire loop.
2. To suspend the hammock from a wooden wall, use the same type of crossed-nails supports, with the nails driven in one above the other.
3. For comfort and safety, hang the hammock with the head end 18 inches higher than the center and with the foot end 24 inches higher than the center.
4. To make sure that the hammock is strong enough, two persons should place their open hands on its centerline and put all of their weight on the hammock.
5. To suspend hammocks and hammock-chairs from a pole roof that is not being built under fear of immediate attack, use loops of strong wire around the poles at the planned support points. (The correct placement of wire loops takes considerable time and delays completion of the shelter.) To reduce stresses and possible breakage, the loops should be loose, as illustrated.
Fig. Pg. 123ab ORNL-DWG 77-17394 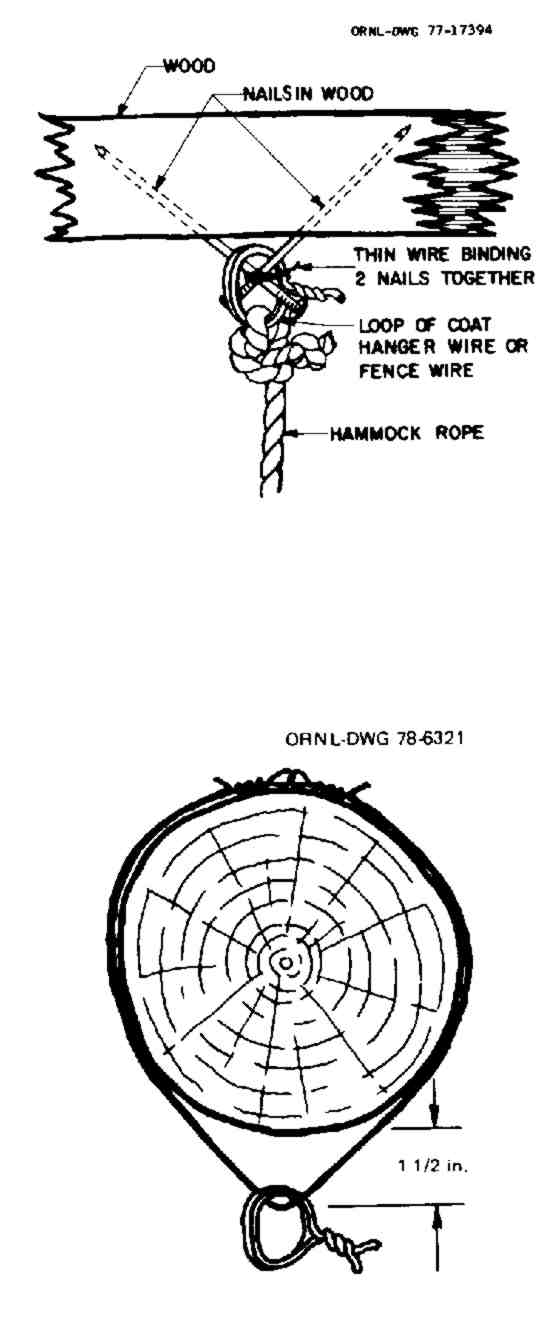
Book Page: 124
MAKING A SUSPENDED BEDSHEET-CHAIR
A Bedsheet-Hammock may be quickly converted into a comfortable Suspended Bed sheet-Chair so that a shelter occupant can sit comfortably, yet occupy less floor space during the daytime. Follow these steps:
1. Select one end of the hammock to be the top of the back of the chair.
2. From this end, measure 52 inches (4 ft 4 in.) along each side-edge of the hammock (see sketch), and mark these two spots.
3. About 2-1/2 inches in from these two marks (toward the centerline of the hammock), make two more marks.
Fig. Pg. 124 ab (2 Illustrations) ORNL DWG 77-18432, ORNL DWG 77-17395 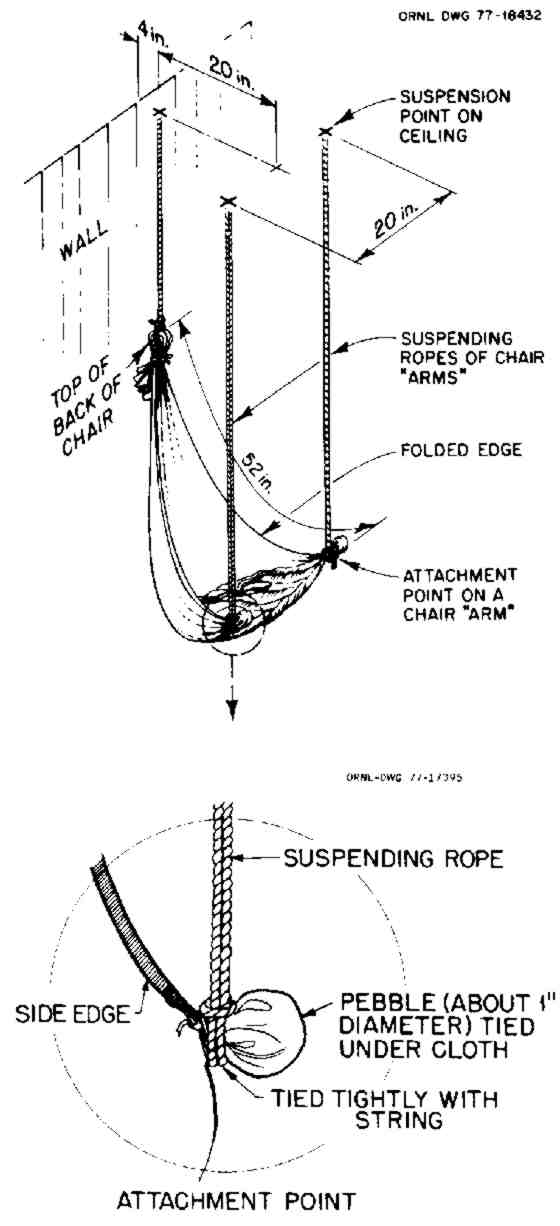
4. To make an attachment point for a chair "arm", hold a pebble (or a lump of earth) under one of these last marks, pull the double-thickness cloth tight around the pebble, and tie it in place. (See illustration.) Repeat on the other side-edge of the hammock.
5. Tie the end of one rope (or "rope" made of 10- inch-wide strip of strong cloth) to one attachment point, and the end of another rope to the other attachment point.
6. Suspend the top of the back of the chair to a suspension point on the ceiling at least 4 inches out from the wall, and adjust the length of this suspending rope so that the chair arms will be about the same height from the floor as the arms of an easy chair (see sketch).
7. Suspend the arms of the chair from two suspension points 20 inches apart and 20 inches farther out from the wall than the suspension point of the back of the chair. (Study the illustration.)
8. Fold the unused end of the hammock up and back into the "seat" of the chair; fill the hollow of the seat with coats, a blanket, or anything else soft, to make it comfortable.
9. Adjust the lengths of all three suspending ropes so that the 'chair seat is the right height for the person sitting in it. When both feet are flat on the floor, the front edge of the seat should not press against the undersides of the thighs.
10. To simplify repeated conversion of the hammock to a chair, mark the spot on each of the 3 suspending ropes where each is tied to its suspension point on the ceiling; also mark the spot on each suspending rope for a chair arm where each is tied to its suspension point on a chair arm. If enough light rope or strong cord is available, the easiest and quickest way to connect and disconnect the arm supports is to suspend each arm with a double strand of rope, looped around an attachment point as illustrated by the sketch of the attachment point.
Book Page: 125