| ||||||
| Ch. 15: Improvised Clothing and Protective Items |
|
| Top | Previous | Next |
BASIC PRINCIPLES OF COLD WEATHER CLOTHING
If Americans would learn to use skillfully the ordinary clothing, towels, cloth, newspapers, and paper bags in their homes, they could keep warm enough to stay healthy even under much colder conditions than they believe endurable without specialized outdoor winter clothing. Efficient cold- weather clothing can be improvised if the following ways of conserving body heat are understood and used:
° Trap "dead" air. Covering enough of your body with a thick layer of trapped "dead" air is the basic requirement for keeping warm. Figure 15.1 shows how efficient body insulation works: Both the air warmed by close contact with the skin and the water vapor from evaporated perspiration flow outward into the insulating material. Any material that breaks up and separates air into spaces no more than 1/8 inch
Fig. 15.1 Efficient body insulation. ORNL-DWG 77-18426 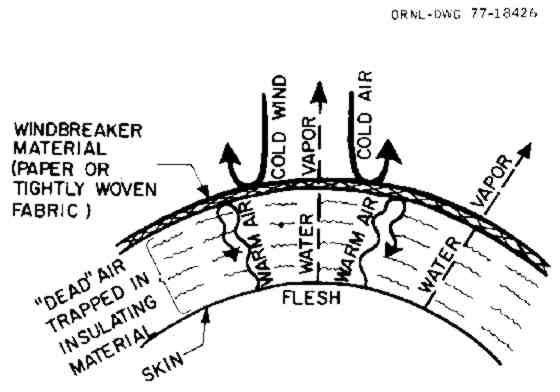
across has efficient cells of "dead" air. Air that is within 1/16 inch of any surface whether that of a filament of goose down or of a piece of paper is slowed down by "sticking" to that surface and becoming hard to move. Trapped "dead" air moves outward very slowly, carrying heat away from the body at a slow rate thus minimizing heat losses by convection.
° Use windbreaker materials. An outer windbreaker layer of clothing that is essentially air-tight, such as a brown paper bag worn over a knit wool cap, prevents the escape of warmed air and results in an insulating layer of trapped "dead" air. A single layer of good windbreaker material also prevents cold outside air from being blown into the insulating material and displacing warmed air (Fig. 15.1).
The best windbreaker materials permit very little air to pass through them, while at the same time they allow water vapor to escape. Perspiration that cannot be felt or seen on cool skin continually evaporates, forming warm water vapor close to the skin. This moisture escapes outward through good insulating and windbreaker materials; as a result, underlying body insulation remains dry and efficient. Water vapor can pass readily through many sheets of newspaper or unglazed brown paper, although not enough wind can flow through a single sheet to be felt.
° Prevent excessive heat losses by conduction. Body heat also is lost by conduction the direct flow of heat into a colder material. For example, if one sleeps in an excellent goose-down sleeping bag laid directly on cold ground, body weight will compress the down to a small fraction of an inch. This barrier to heat flow' is too thin and will cause the body to lose heat rapidly to the cold earth. Likewise, the soles of ordinary shoes are such poor insulators that standing or walking on frozen ground sometimes results in frozen feet.
Book Page: 126
MINIMIZING HEAT LOSSES FROM HEAD AND NECK
The head and neck of the girl pictured in Fig. 15.2 are insulated almost as well as if she were wearing the hood of a skin-side-out Eskimo parka. She folded a large, fluffy bath towel and placed it over her head, neck, and the upper part of her body. A brown paper bag was worn over the towel. The edges of the face hole cut in the bag were taped to prevent tearing. A strip of cloth was tied around the part of the bag over her neck. Such a parka-like covering not only is the most efficient way to insulate the head and neck but also prevents air warmed by the body from escaping upward around the neck. The girl also is wearing a man's shirt large enough to cover and hold thick newspaper insulation around her body and arms.
Fig. 15.2. A bath towel and a paper bag used to efficiently insulate head, neck, and shoulders. 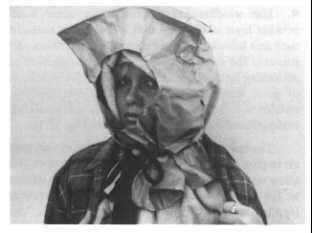
It is very important to prevent heat losses from the head and neck, which have many blood vessels near the skin surface. Heat losses from these vital parts cannot be sensed nearly as well as heat losses from other parts of the body. Furthermore, blood vessels near the surface in the head and neck do not automatically constrict to reduce heat losses, as they do in other parts of the body when heat is being lost faster than it can be supplied by metabolism. So when a person is in the cold particularly when inactive he should keep his hands, feet, and whole body warmer by insulating his head and neck very well. (One difficulty in following this advice is that a wellcovered head often will feel unpleasantly warm even sweaty before one's body temperature rises enough to increase the warming flow of blood to hands and feet.)
INSULATING THE WHOLE BODY
Occupants of freezing-cold shelters can keep warm enough to sleep without blankets by skillfully using ordinary indoor clothing plus paper and pieces of cloth to insulate their whole bodies. The girls pictured in Fig. 15.3 slept without a blanket in a frozen Door-Covered Trench Shelter while the night temperature outdoors dropped to 100 F. The shelter's ventilation openings were adjusted so that the inside temperature remained a few degrees below freezing, to prevent frozen earth from melting into icy mud. These girls had insulated themselves well. First, they covered their cotton shirts and pants with 10 thicknesses of newspaper wrapped around their bodies and tied with strips of cloth. Then around each arm and leg they wrapped and tied 8 sheets of newspaper, thus insulating their limbs with at least 16 thicknesses.
Fig. 15.3. Girls wearing expedient clothing are prepared for sleeping in the freezing cold trench shelter. 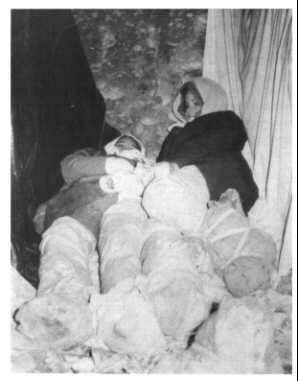
Book Page: 127
As an outer covering over their legs, they wrapped wide strips torn from a bedsheet. Their expedient foot coverings were of the type described in a following paragraph. Their heads and necks were insulated with towels covered with brown paper bags. Old cotton raincoats allowed water vapor to pass through and helped hold in place the insulating newspapers, which extended to cover the girls' bare hands.
The girls slept on newspapers spread about an inch thick over the gravel floor of the trench. When sleeping on cold or frozen ground, it is best to place newspapers or other insulation on top of a layer of small limb-tips or brush, so that drying air can circulate under the bedding. A sheet of plastic under bedding will keep it from being dampened by a wet floor but will not prevent it from being dampened after a few days by condensed water vapor from the sleeper's body.
Newspaper and other paper through which water vapor can pass are such good windbreaker materials that they can be used under any loosefitting outer garment even one through which air can pass quite readily. They also provide good insulation. Figure 15.4 shows the author coming out of an icy shelter at sunup. Many thicknesses of newspaper covered my body and arms and extended like cuffs from my sleeves. A porous cotton bathrobe covered the newspapers and helped hold them in place. Because so little heat was lost through this clothing, plenty of warm blood continued to flow to my bare hands, ridding my body of excess heat by radiation.
IMPROVISED WINTER FOOTWEAR
Cold-weather footwear that is warmer than all but the best-insulated winter boots can be improvised readily. The trick is learning how to tie the several insulating layers securely in place, so that you could hike for miles in the snow if necessary.
For use in dry snow, first tie a porous insulating layer such as two bath towels or 10 big sheets of newspaper over each shoe. If you have no low- heeled shoes, make a paper sole by folding 3 large newspaper sheets to make a sole that has 72 thicknesses of paper. Then proceed in the following manner:
1. Place your foot and the sole on 10 newspaper sheets, as pictured in Fig. 15.5.
Fig. 15.4. The author emerges after a night's sleep in freezing cold temperatures inside a Car-Over-Trench Shelter. Expedient clothing, primarily newspaper insulation, kept him warm without a blanket. 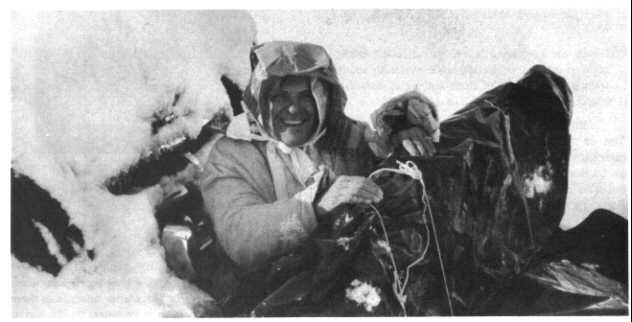
Book Page: 128
2. Fold all the sheets over the top of your foot while keeping the sole in the proper place, as indicated in Fig. 15.5.
3. Use a strip of cloth about 3 inches wide and 5 feet long to tie the papers in front of your ankle with a single overhand knot (half of a square knot). With the same strip, tie another single overhand knot over the tendon behind the ankle. Finally, tie a bow knot in front of the ankle.
4. Cover the insulating layer with a tough fabric, such as canvas or burlap sack material; secure with a second strip of cloth and tie as described above.
If the snow is wet, place a piece of strong plastic film or coated fabric outside the insulating layer, after securing it with the first strip of cloth. The outer protective covering should be tied over the waterproofing, with the second strip of cloth securing both it and the waterproofing. (When resting or sleeping in a dry place, remove any moistureproof layer in the foot coverings, to let your feet dry.) Figure 15.6 shows a test subject's waterproofed expedient foot- covering, held in place as described above, after a 2-mile hike in wet snow. His feet were warm, and he had not stopped to tighten or adjust the cloth strips.
Fig. 15.6. Expedient water-proofed foot- covering, over a newspaper sole and other newspaper insulation. 

Persons who have not worked outdoors in icy weather seldom realize the importance of warm footwear for winter. Russian civil defense manuals direct urban citizens to take winter boots with them when they evacuate, even in summer.
Fig. 15.5. Insulating a foot with a folded newspaper sole and 10 sheets of newspaper. 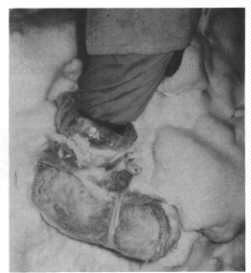
Book Page: 129
KEEPING WARM WITHOUT FIRE
° If occupants of a cold room or shelter lack adequate clothing and bedding, all should lie close together.
° Always place some insulating material between your body and a cold floor. (Pieces of shag rug are excellent.) Plastic film should be placed under the insulating material if the ground is damp.
° Go to bed or put on all your body insulation before you begin to feel cold. Once the loss of body heat causes blood vessels in your hands and feet to constrict, it often is hard to get these vessels to return to normal dilation again.
° Do not jump up and down or wave your arms to get or to keep warm. The wind-chill factor is a measure of air movement over your skin; rapid body movements always cause some such air movement. If practical, lie down and cover up; then do muscular tension exercises by repeatedly tightening all your muscles so tight that you tremble.
° Prevent sweating and the dampening of insulation by taking off or opening up clothing as you begin to exercise, before you begin to sweat.
° If you are getting cold, don't smoke. Nicotine causes blood vessels to constrict and the flow of blood to hands and feet to be reduced.
° Don't drink an alcoholic beverage to warm yourself. Alcohol causes increased blood flow close to the skin surface, resulting in rapid loss of body heat. It is impossible for alcohol to make up for such loss for very long.
RAINWEAR
All that is needed to make serviceable, improvised rainwear is waterproof material and waterproof tape. Plastic film from large trash bags will do; 4-mil polyethylene is better; tough, lightweight, coated fabric is best. Fabric duct tape is the best widely available tape.
Figure 15.7 shows a pair of improvised rain chaps. Rain chaps are separate leg coverings, each with a loop to suspend it from one's belt and usually made large enough to be pulled on and off over the shoes and trousers. Rain chaps are better than waterproof trousers for working or walking while wearing a poncho or raincoat, because body movements cause drying air to be literally pumped under the chaps. This air keeps trousers and legs dry, and therefore warmer.
Fig. 15.7. Improvised rain chaps made of trash- bag polyethylene and freezer tape. 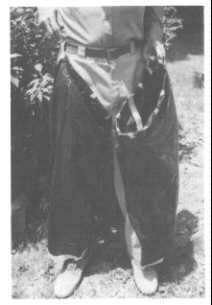
In the same way, a poncho or rain cape will allow plenty of air to reach the garments under them while one is working. When exercise is stopped, clothing underneath will stay dry and warm for some time.
SANDALS
Shoes are almost always in short supply for years following a disastrous war. Except in very cold weather, sandals can be made to serve quite well. The best sandal designs for hard work and serious walking have a strap around the heel and in front of the ankle, with no thong between the toes (Fig. 15.8).
Fig. 15.8. A Ho Chi Minh Sandal, excellent Vietnamese expedient footwear. Rubber bands cut from an inner tube have been inserted into a sole of auto-tire tread. 
Book Page: 130
Such sandals also have the advantage of enabling one to wear socks and other foot insulation inside the straps.
| Top | Previous | Next |
CLOTHING TO PROTECT AGAINST BETA BURNS
If fresh and very radioactive fallout particles remain for long on the skin or extremely close to the skin, beta burns result. Any clothing that keeps fallout off the skin helps greatly. The best expedient protection is given by an outer layer of easily removable clothing similar to the improvised rainwear previously described, but fully covering the hair and neck and providing plastic trousers instead of chaps. Removable shoe coverings are highly advisable. All such protective coverings should be removed before entering a shelter, or removed in the entryway before going into the shelter room.
If a person has fallout particles on clothing that he must continue to wear, he should vigorously brush his outer clothing before entering a shelter room. If fallout particles are washed off, rinsed off, or otherwise removed from the skin within a few minutes, no beta burns will result.
A few days after a nuclear explosion, fallout particles are not radioactive enough to cause beta burns. In areas of heavy fallout, the danger from external doses of gamma radiation from fallout on the ground will continue much longer than will the risk of beta burns from some of these same fallout particles.
The gamma rays given off by fallout particles brought into a shelter on clothing or bodies would subject shelter occupants to gamma doses so small as to be of no significance by wartime standards. Nor would shelter occupants be endangered by radiation from the body of a person who, before reaching shelter, had received a gamma dose large enough to kill him many times over. Except in science fiction stories, the body of such a person does not become radioactive."
FALLOUT MASKS
For the majority of Americans in most fallout areas, means for filtering fallout particles out of the air they breathe would not be essential survival equipment.18 Most fallout particles tiny enough to enter one's lungs would fall to earth so slowly that they would reach ground thousands of miles away from the explosions. By then, radioactive decay would make them much less dangerous, and their deposition would be spread out over much of the earth.
In past years American-endangering Soviet warheads typically' were between 20 and one megaton. Explosions this large would inject almost all fallout particles into the stratosphere, high above rain clouds. Today thousands of deployed Soviet ICBM warheads are between 550 and 100 kilotons. (See Jane's Weapons Systems, 1987-88.) Both surface bursts and air bursts of today's smaller warheads would inject most of their radioactive particles into the troposphere, from whence rain-outs and snow-outs would bring huge numbers of even tiny particles to earth in '"hot spots" scattered across America.
Persons living in dry, windy areas often wear dust masks and goggles to protect their noses and eyes from dust and sand particles. If fallout particles are mixed with dust and sand that is being blown into a shelter, then persons in windy areas who occupy small below-ground expedient shelters should cover their noses and mouths with several thicknesses of towels or other cloth. Those who have dust masks should wear them, especially when working outside in dry, windy weather soon after fallout deposition. Other than whole-body exposure to gamma rays, the main danger to well informed people would be from possible beta burns caused by fresh. "hot" fallout particles that would collect in nasal passageways, and from swallowed fallout particles. (Much of the material continually eliminated from the nose and throat is swallowed.) In some fallout "hot spots" a secondary danger would be breathing extremely small, "hot" fallout particles into one's lungs, after a rain-out of tiny fallout particles from fallout clouds produced by today's typical kiloton-range Soviet warheads. In some areas "hot" particles would be dried and blown about by the winds within hours of their deposition in rain showers.
Making a homemade dust and fallout mask is still not a high priority survival project. In normal times, it is better to buy and store good masks and goggles. The following instructions for making a homemade mask are an improved design based on a Russian design (Fig. 15.9). This mask is the best of several
Fig. 15.9. A Russian-type homemade fallout mask. For most Americans this will continue to be a low-priority item as long as Russian warheads are large. ORNL-DWG 78-11921 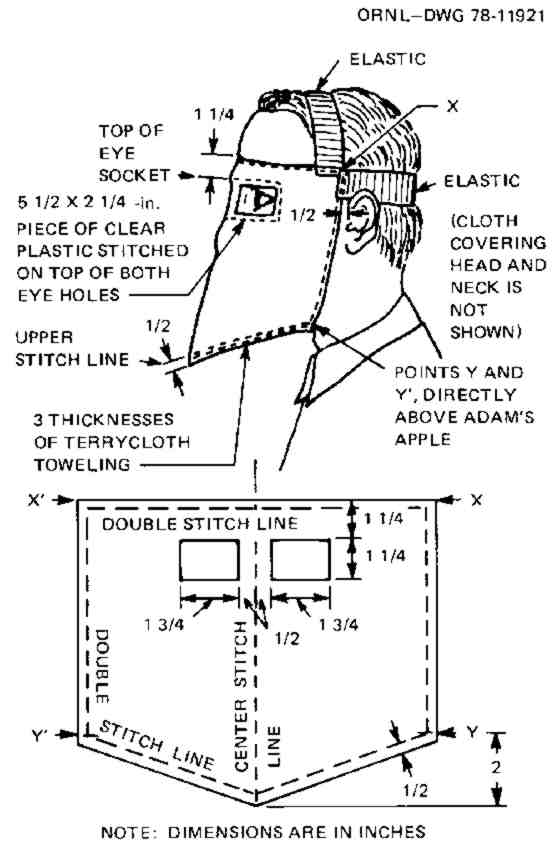
Book Page: 131
homemade types, and the following instructions for making and using it have been field-tested.
AN INDIVIDUALLY-FITTED FALLOUT MASK
Materials Needed:
1. Three rectangular pieces of fluffy toweling (terry cloth preferred), each piece approximately 12X 15 inches (or use 10 men's handkerchiefs).
2. Elastic. (The best expedient elastic is from the waistband of a man's undershorts.)
3. Clear plastic (from a photo album, billfold, plastic storm window, etc.).
4. Sewing materials.
Measurements:
1. Tie a string vertically around your head and face, passing it 1/2 inch in front of each of your ears and making it quite tight.
2. Tie a second string horizontally around your head, crossing your forehead 11/4 inches above the top of your eye sockets. These two strings should cross each other at points X and X1, over your temples.
3. Measure the distance X-to-X1 across your forehead and the distance X-to-X1 going under your chin (around your lower jaw and next to your throat), as indicated by Fig. 15.9.
Construction:
1. Cut out 3 pieces of terry cloth, making the width of each piece equal to X-to-X1 (the curved distance across your forehead), and the height of each piece equal to the distance X-to-Y plus 1/2 inch -- that is, equal to half the distance X-to-X1 (measured under your chin) plus 1/4 inch. See Fig. 15.9.
2. Cut the lower edge of each piece as illustrated.
3. Stitch the 3 pieces of terry cloth together, one on top of the other, thus making the mask three layers thick. Stitch around all four edges of the cloth rectangle and down the centerline.
4. Mark and cut out the eye holes, as illustrated. Make the mask's dimensions smaller for children.
5. Cut one rectangle of clear plastic measuring s\;2 X 21/4 inches, and sew this plastic over the outside of the eye holes, stitching the plastic around its edges and down the centerline.
6. Fold the three pieces along their vertical centerline and stitch the lower side together, along the upper stitch line Y-to-Y1. Stitch /2 inch from the lower edge. Then sew a second row of stitches.
7. Sew on the elastic head bands, making them short enough to hold the mask tightly around your face. If the elastic is from the waistband of a man's undershorts, use a doubled elastic both over the top of your head and around the back of your head. Make these elastic pieces so short that you can just put all your fingers comfortably between the elastic and your head when the pieces are fully stretched. If using a weaker elastic, be sure to adjust the lengths to a tight fit, to prevent air leaks under the edges of the mask. Because of the thickness of material where the elastics are connected to the upper corners of the mask, it may be necessary to do this stitching by hand.
8. To keep fallout particles off your head and neck, sew a loose-fitting piece of bedsheet cloth (not illustrated) to the edges of the mask that fit around your face. This cloth should extend back over your head and down over your collar, over which it can be tied.
Use:
Put on the mask by first placing it over your chin, then pulling the back elastic down to fit around the back of your head.
CAUTION:
To avoid spreading infections, each mask should be labeled and worn by only one person.
Book Page: 132
Chapter 16
Minimum Pre-Crisis Preparations
Your chances of surviving a nuclear attack will be improved if you make the following low-cost preparations before a serious crisis arises. Once many Americans become convinced that a nuclear attack is a near certainty, they will rush to stores and buy all available survival supplies. If you wait to prepare until a crisis does arise, you are likely to be among the majority who will have to make-do with inadequate supplies of water containers, food, and materials. Furthermore, even if you have the necessary materials and instructions to make the most needed survival items, you and your family are not likely to have time to make all of them during a few days of tense crisis.
The following recommendations are intended primarily for the majority who live in areas likely to be subjected to blast, fire, or extremely heavy fallout. These people should plan to evacuate to a safer area. (Many citizens living outside high-risk areas, especially homeowners with yards, can and should make better pre-crisis preparations. These would include building high-protection-factor permanent shelters covered with earth.)
SHELTER
Keep on hand the tools and materials your family or group will need to build or improve a high- protection-factor expedient shelter: One or more shovels, a pick (if in a hard-soil area), a bow-saw with an extra blade, a hammer, and 4-mil polyethylene film for rainproofing your planned shelter. Also store the necessary nails, wire, etc. needed for the kind of shelter you plan to build.
Keep instructions for shelter-building and other survival essentials in a safe and convenient place.
VENTILATION-COOLING
Make a homemade shelter-ventilating pump, a KAP, of the size required for the shelter you plan to build or use.
WATER
Keep on hand water containers (including at least four 30-gallon untreated polyethylene trash bags and two sacks or pillowcases for each person), a pliable garden hose or other tube for siphoning, and a plastic bottle of sodium hypochlorite bleach (such as Clorox) for disinfecting water and utensils.
FALLOUT METER
Make one or two KFMs and learn how to use this simple instrument.
FOOD
Store at least a 2-week supply of compact, nonperishable food. The balanced ration of basic dry foods described in Chapter 9, Food, satisfies requirements for adults and larger children at minimum cost. If your family includes babies or small children, be sure to store more milk powder, vegetable oil, and sugar.
Continuing to breast-feed babies born during an impending crisis would greatly simplify their care should the crisis develop and worsen
For preparing and cooking basic foods:
° Make a 3-Pipe Grain Mill like the one described in Chapter 9, Food, or buy a small hand-cranked grain mill, which grinds more efficiently than other expedient devices.
Book Page: 133
° Make a Bucket-Stove as described in Chapter 9. During evacuation, the stove can be used as a container. Store some kitchen-type wooden matches in a waterproof container.
° Keep essential containers and utensils on hand for storing and transporting food and for cooking and serving in a shelter.
SANITATION
A hose-vented 5-gallon can, with heavy plastic bags for liners, for use as a toilet. Includesome smaller plastic bags and toilet paper with these supplies. Tampons.
Insect screen or mosquito netting, and fly bait. See Chapter 12.
MEDICINES
° Any special medications needed by family members.
° Potassium iodide, a 2-oz bottle, and a medicine- dropper, for prophylactic protection of the thyroid gland against radioactive iodines. (Described in the last section of Chapter 13, Survival Without Doctors.)
° A first-aid kit and a tube of antibiotic ointment.
LIGHT
° Long-burning candles (with small wicks) sufficient for at least 14 nights.
° An expedient lamp, with extra cotton-string, wicks, and cooking oil as described in Chapter 11.
° A flashlight and extra batteries.
RADIO
A transistor radio with extra batteries and a metal box in which to protect it.
OTHER ESSENTIALS
Review the EVACUATION CHECKLIST (developed primarily for persons who make no preparations before a crisis) and add items that are special requirements of your family.
Book Page: 134